Why Host on IBM Pages?
Hosting code on IBM pages can allow you to better experiment and learn as a designer, host clickable prototypes for usability testing, and communicate with your team (by building and sharing a style guide, for example).
Note: this is specifically useful for projects internal to IBM, and you won't be able to share it with people outside the firewall. If you'd like to host projects externally for free on GitHub Pages, GitHub provides an excellent explanation of how to do so.
If you're already comfortable with the command line, have your SSH key set up, and have git installed on your computer, feel free to skip ahead to "How to Host on Pages". Otherwise, let's start with some prerequisites!
Finally, this tutorial claims to "Explain-It-Like-I'm-5." That basically means that it attempts to specify all the steps, and explain why you do each thing. If you can't figure something out, it's probably a failure of this tutorial. Feel free to ping me at snixon@us.ibm.com, or tweet at me at @thundernixon.
1. Command Line Basics
Let's start with some basics of the command line.
The command line allows you to do some awesome things with computers and the internet. It's intimidating at first, but once you know a few basic commands, it becomes pretty friendly, pretty quickly. Like your mom used to say when you were trying food for the first time, "Try it, you'll love it!"
Note: these directions are specifically for Mac OSX users.
Open the "Terminal" app.
Notice what it says in there – that will tell you "where" you currently are in the computer. You should be in your top-level user folder (for me, that looks like Stephen-Nixon:~ stephennixon$).
Next, let's make a new folder. Input:
mkdir your-folder-name
(And press your enter/return key to input commands like this).
This will create a folder. Keep in mind, it's best to make folders that are all lowercase and have no spaces.
Let's find out what folders are in your current location, and check if your new folder is in there. Type in:
ls
This will tell you all the files and folders that exist in whatever directory you're currently in ("directory" is just a fancy term for "folder").
Next, let's navigate to a folder. Say you want to go from where you are into a folder called "websites." You would input:
cd websites
The "cd" stands for "Change Directory." Want to go back up a folder? Try:
cd ..
The double periods signify "go up a level." If you'd like to go up multiple levels, you can simply use .. for each level you want to navigate. So, if you want to navigate up two levels, that looks like:
cd ../..
mkdir your-site-name
This will create a folder
You can do waaay more than this with the command line, and in fact, you will in the rest of this tutorial. But hopefully, this shows you that it's pretty fun and relatively painless as an alternative to opening up a Finder window every time you want to navigate your computer. Sometimes, all-text interfaces just works better!
Also, now that you know the basics of using the command line, you should check out and consider downloading iTerm 2. I see lots of Front-end Devs using it, and that's because it has a bunch of nice features sprinkled in.
2. Generating Your SSH Key
To securely connect your computer to GitLab, you'll need to create what's called an "SSH Key." Full disclosure: for this section, I'm pretty much copying very similar instructions from GitHub.
If you're curious, "SSH" stands for "secure shell," and it's just a way to have an encrypted (i.e. secure) connection from your computer to a remote computer, over an regular (i.e. insecure) network.
I: Generate your SSH key
First, let's check for SSH keys already on your computer, just in case. Open your terminal and input:
ls -al ~/.ssh
If you have SSH keys already, you'll probably see one of the following names:
id_dsa.pub
id_ecdsa.pub
id_ed25519.pub
id_rsa.pub
If you already have an SSH key that you are okay with using to connect with GitLab, skip a bit, and cruise right onto step 12(?).
If you don't have an SSH key yet, let's generate one.
Still in your command line, input the following, but with your own IBM email address:
ssh-keygen -t rsa -b 4096 -C "your_email@us.ibm.com"
Remember to swap out your_email@us.ibm.com for your ACTUAL email : )
You'll be asked to enter a file name, but you should just go with the suggested name. That'll look something like:
Enter file in which to save the key (/Users/stephennixon/ .ssh/id_rsa):
(Press Enter to continue).Now, you'll be asked to enter a passphrase (AKA password). You can decide to skip this or not, based on whether or not you want to lock down your path to GitLab super tightly or not.
It is best practice to use a passphrase. However, if your Mac has a password required to log on and use it (it probably does, and if not, set that up now), you won't be gaining a whole lot by setting up a passphrase to this SSH key. However, if you do want to set it up, refer to GitHub's advice on it.
Enter passphrase (empty for no passphrase):
Press Enter to skip, or type a passphrase
Enter same passphrase again:
Press Enter to skip, or type your passphrase again
You'll be given a fingerprint (AKA "id") of your SSH key. It will look something like:
Your identification has been saved in /Users/you/.ssh/id_rsa.
Your public key has been saved in /Users/you/.ssh/id_rsa.pub.
The key fingerprint is:
01:0f:f4:3b:ca: 85:d6:17:a1:7d: f0:68:9d:f0:a2: db your_email@us.ibm.com
II: Add your SSH key to GitLab
Go into GitLab. Go into your "Profile Settings."
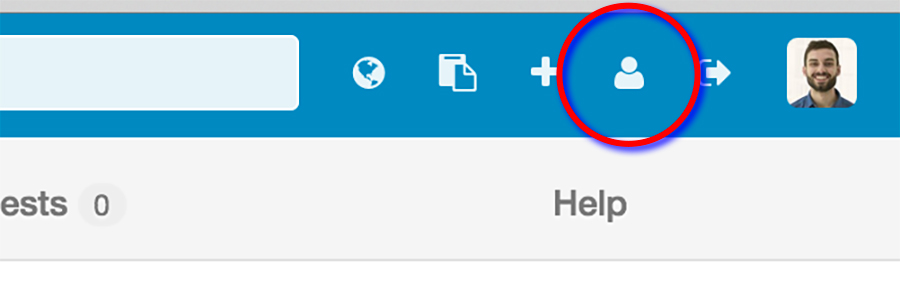
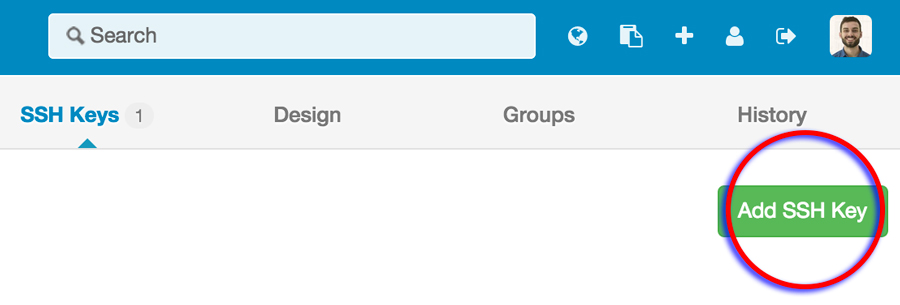
Now, go into "SSH Keys."

Find and click the green button labeled "Add SSH Key"
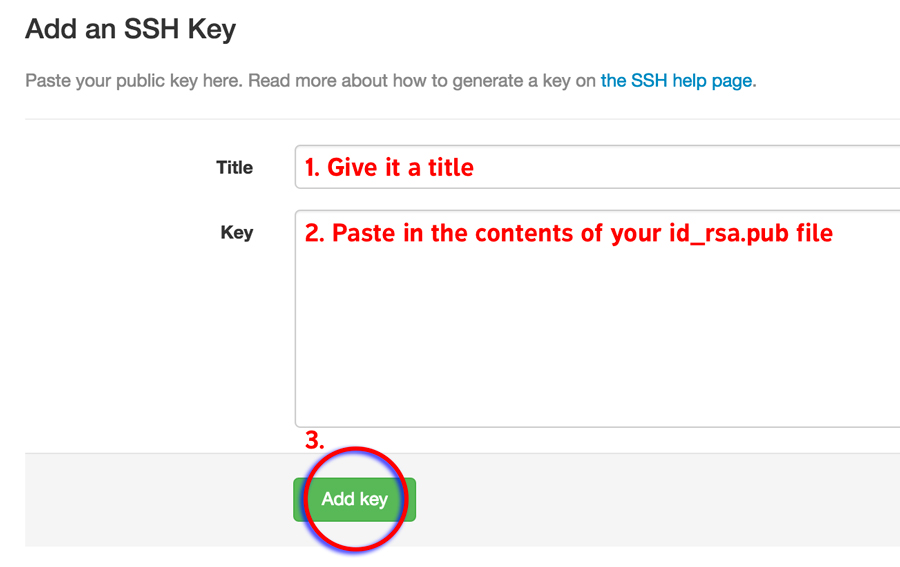
Give the SSH Key a title. "Macbook" or your email will work well.
Open your rsa_id.pub file in a text editor, and then copy the contents.
Paste the contents into the field titled "Key."
Great job! You now have a secure connection between your computer and GitLab. You're ready to start using Git to upload your files for hosting.
3. If you haven't used Git before...
Git is something I'm still learning, but it's a great way to store and sync code project files online. It's main uses are for version control and collaboration, but I sheepishly admit that I have barely taken advantage of those aspects, as of the writing of this tutorial.
What I have found it extremely useful for is for moving files around, storing them on GitLab and GitHub, and using services to move those files from these repositories into hosting servers (pretty much what we're doing in this tutorial). I'm sure I'll be using it more fully soon, but for now, just know that you can be more productive, without having to learn all that much.
Note: these directions are specifically for Mac OSX users.
Go to this sourceforge project page and download the download.
This is Git 2.2.1 for Mac OSX. You can install it like any other application, with the standard Mac wizard.
That's it; you should be ready to go!
4. How to Host on Pages
If you're comfortable with the basics of the command line and of Git, let's get to hosting!
I: Make your project and put git in it
First, let's set up the project folder. Open up your command line, and navigate to whatever folder you like to make web projects in (for me, that means I start by entering cd code). Then, make a new directory by inputting:
mkdir your-project-name
Next, go into that directory:
cd your-project-name
Let's make a git repository in here (a hidden folder that will track your version history):
git init
The command will respond with Initialized empty Git repository in /Users/yourusername/yourcodeprojectsfolder/your-project-name/.git/I personally like to check to make sure the git folder was created. To do so, input:
ls -A
If you see a response including the filename .git, you're golden.
Let's put another file in the project, because you'll need it soon. Input:
touch README
This will create a file called "README."
To make sure our git repo is updated with the new file, input:
git add .
This will add all new files and updated files into your repo. (You'll do this each time you want to update and send your project to the GitLab repo).
Next, you should write a short note to say what this update does. Input this:
git commit -m "First commit."
(Your subsequent commit messages should be more specfic, saying things like "Adds hero image to homepage" or "Fixes checkbox bug in user form").
The last piece of updated your repo is simple. Just push it:
git push
II: Set up the project on GitLab
Next, go to GitLab at https://git.design.ibm.com/
Log in, if you need to.
On your logged-in homepage, click the green "+ New Project" button.
You'll be brought to a New Project configuration page.
Give the project a Name and Description. If you want, choose what access to give the project.
No matter what access you select, this project will only be visible to people inside the IBM firewall. The Access you choose here is specific to how you want to share this code with other IBMers. It can be changed later.
Click "Create Project."
Nice! You've created your project. You'll now be on a page that gives you some instructions for what to do in the command line. Keep that page open.
III: Connect your project with GitLab
Go back into your terminal again. Get to your project directory if you're not already in there. In that, input:
git remote add origin git@git.design.ibm.com:yourgitlabusername/your-project-name.git
(And be sure to put your own details in there, or copy the appropriate line from the GitLab page)
This will connect your local project with the project on GitLab.
Now you're ready to push your project up to GitLab! To beam it up, input:
git push -u origin master
While we're at it, let's make a Hello World test for the new site. Still in your local project folder, input:
touch index.html
This creates a basic HTML file. Let's get fancy and edit it right in the command line. Input:
nano index.html
This will pull up a simple text editor right in your command line. It might be weird at first, but it's pretty convenient and easy.
In here, just type in Hello World (or whatever), and then press Control+X.
It'll ask if you want to save. Press your Y key, type in a new title if you really want to, and then press your return key.
Great, you have an index file! To make sure it goes into your local and remote repos, do the following commands:
git add .
git command -m "Adds hello world test in index.html file"
git push
IV: Connect your GitLab repo with IBM Pages
Now it's time to connect your GitLab repo with IBM Pages, to make the real magic happen.
Go GitLab, and navigate into your project.
Find the "Settings" tab in the second-top-nav. Click it.
In the left nav of Settings, find "Web Hooks." Click it.
Okay, so be careful here; you need to be specific. In the "URL" field, paste http://pages.design.ibm.com/deploy
Make sure the "Push events" checkbox is selected (it should be by default). Click the button "Add Web Hook."
The URL you just entered will add to a "Web hooks" space at the bottom of this screen. Next to it, click the button "Test Hook."
Nothing much will happen. That's okay; your web hook is set up!
V: View and share your masterpiece
Select and copy your GitLab project's main URL from the URL bar.
(For this project, that looks like https://git.design.ibm.com/snixon/howto-hostonpages).
Open a new tab. Paste your copied URL into the URL bar. Before entering it
swap out git with pages
swap out https with http
...and add /master to the end of the URL. Now go to the URL.
Note: If you are further along in a project, you may also have to add /dist to the URL, to get what you're expecting. (Extra note: to reach /dist, you may have to remove it from a .gitignore file, if you have one).
(For this project, this all looks like http://pages.design.ibm.com/snixon/howto-hostonpages/master).
You should now be seeing your "Hello World" test.
Great Job! You did it. And if you couldn't figure out a specific part, please reach out to me to let me know, so I can improve this tutorial. Ping me at snixon@us.ibm.com, or tweet at me at @thundernixon.